Guide
Getting Started
Welcome to BigBlueRiver API. Here you will find everything you need to become an API expert. You will learn how to set up and use our APIs in Adalo and other No-Code platforms.
BigBlueRiver is an API service crafted to extend the functionality on Adalo, a No-Code platform. Everything is designed to work and integrate seamless with Adalo, but you can also use this API with any other platform. It will work just fine!
How to Read this Documentation?
We try to keep our guide beginner-friendly and easy to understand and follow. To not waste your time, choose yourself where to start:
If you have never used an API with Adalo before, we recommend to start here
→ Custom Actions in Adalo, shown below and on the left
If you are more experienced with the usage of APIs, you might as well start here
→ Creating an API Request, shown below and on the left
Here to check out our APIs?
→ See the section API Reference on the left.
Custom Actions in Adalo
In order to set up an API Request in BigBlueRiver you will need the Custom Action feature, available only in their Paid Plans.
Follow those steps in order to set up an Custom Action in Adalo:
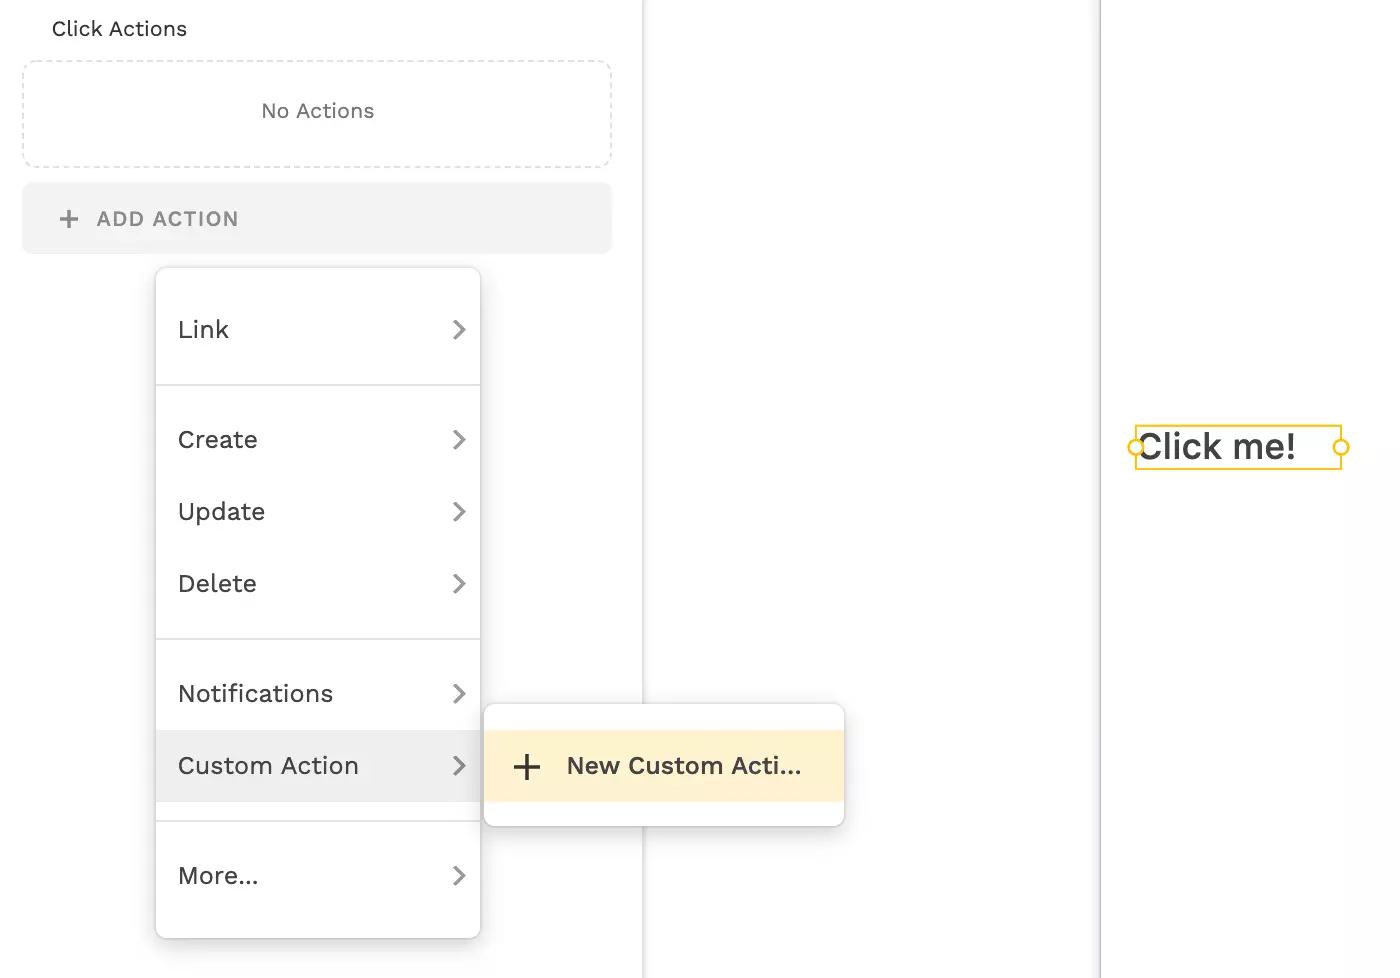
Step 1: Navigate to the Custom Action Editor
- Log in to your Adalo account and open your app.
- Select an element in the Adalo canvas.
- Click on + ADD ACTION or + ADD ANOTHER ACTION.
- Go to Custom Actions.
- Click on + New Custom Action.
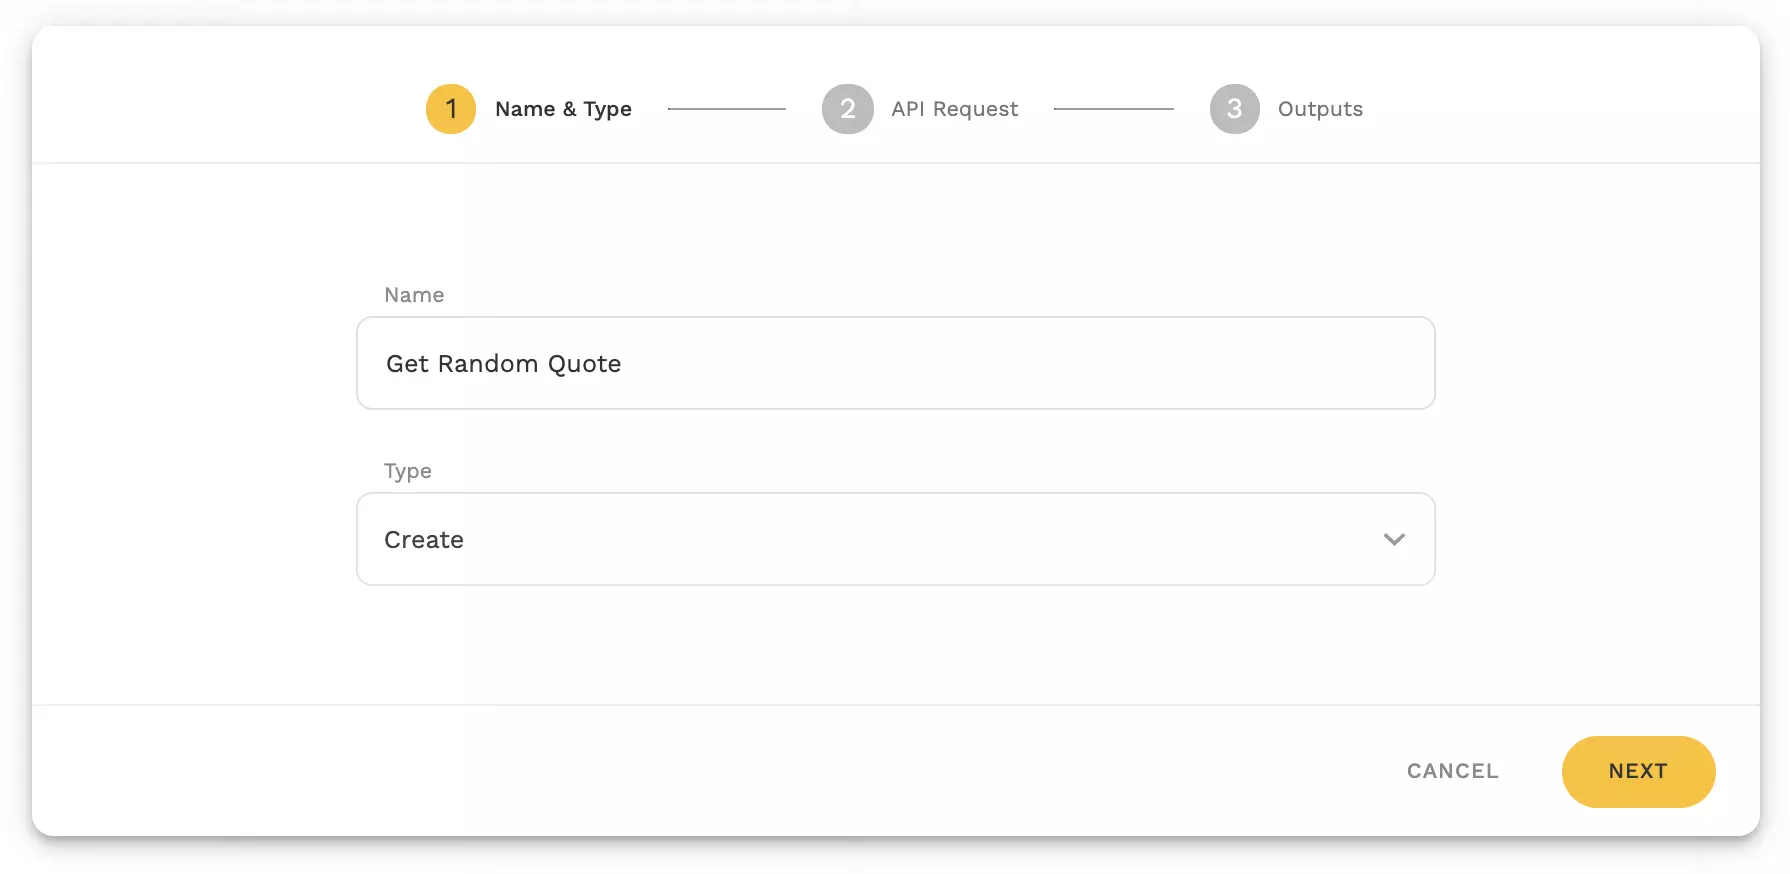
Step 2: Create a Custom Action
In this step you will set up a Custom Action with example values.
-
In the first step "Name & Type", you will give a name to the Custom Action that will help you find it easier later and determine, in Type, what this Action will do (the chosen value does not matter 😉).
-
In the second step "API Request" you will configure the API Request, click here for more details.
-
In the last step "Outputs" you will find the information that you have requested with the API. Under Magic Text Output Properties you could edit those Outputs in order to give them a more fancy names.
Step 3: Use the created Custom Action in your App
Once you have created your Custom Action you will be able to add the action whenever you want and change the parameters values accordingly to the needs of the circumstance.
TIP
If you want to know more about Custom Actions, you can read more about it in the official documentation.
Creating an API Request
In the second step of the creation process of a Custom Action you will have to configure the API Request that you want to set up.
This screen is separate into 2 major parts:
- To the Left, from the top:
- API Base URL
- Method
- Header & Query Parameters
- Body where you can add your JSON text.
- To the Right:
- Inputs
API Base URL
The API Base URL is the endpoint of the request.
- Choose an API function from our API Reference, shown on the left.
- Copy the API Base URL and paste it in the corresponding field in Adalo.

Method
All BigBlueRivers APIs use the POST method.

Headers & Queries
In this section you will add your Authentication Credentials (API Key) and the Parameters that you will need in order to use your desired API function. By clicking on + ADD ITEM you will see two options: Header and Query Parameter.
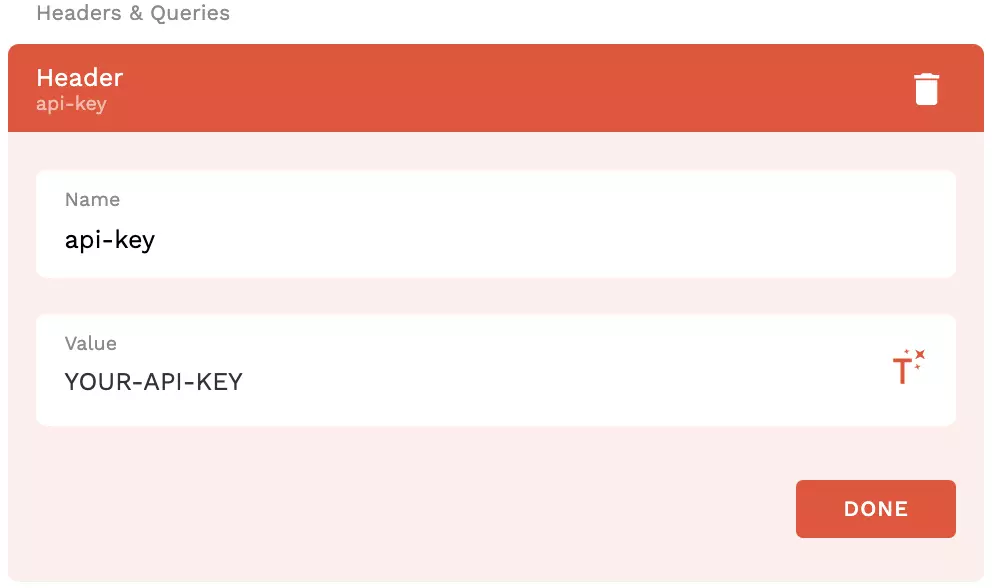
Step 1: Add Your API Key Header
You will create a Header in order to authenticate your API request. Create a Header to set your API key (Name:api-key) and authenticate your request. See the Authentication section below for more details.

Step 2: Attach Parameters
Some API functions, like Random Quote (See API Reference to the left), do not require you to attach any parameters. In this case you can just move on! But most APIs will have at least one parameter for you to specify. For each parameter, create a Query Parameter.
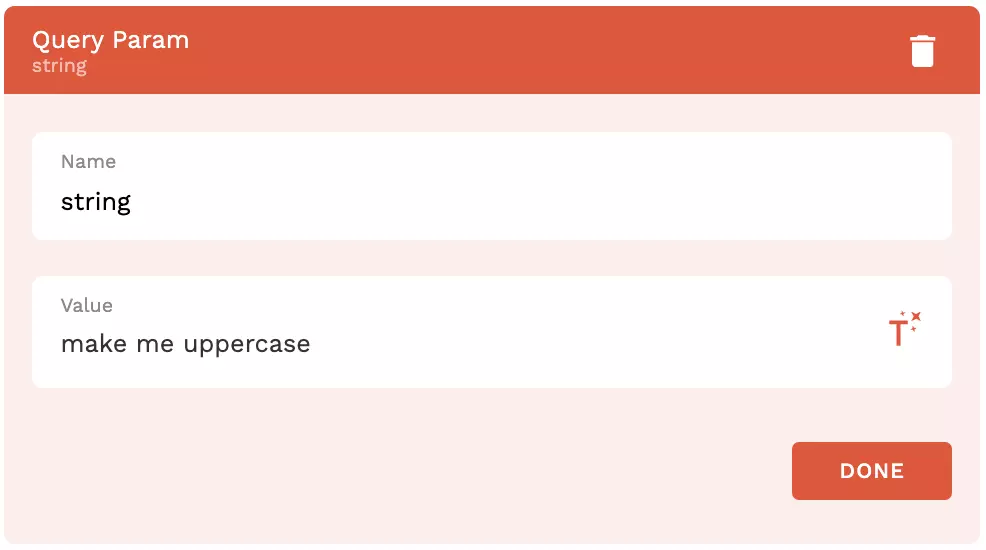
You can also change the value of a parameter dynamically by using Inputs (See section below).
Body
Leave this empty! At BigBlueRiver, our goal is to simplify the set up as much as possible, that is why we do not use this section. Everything is pre-fabricated.
Finalize the Action
In order to finalize the action and persist its configuration, click RUN TEST REQUEST at the bottom of the panel. This at the same time gives you the chance to see if your query succeeded.
If your action succeed, you should see a response similiar to this containing one or multiple outputs:
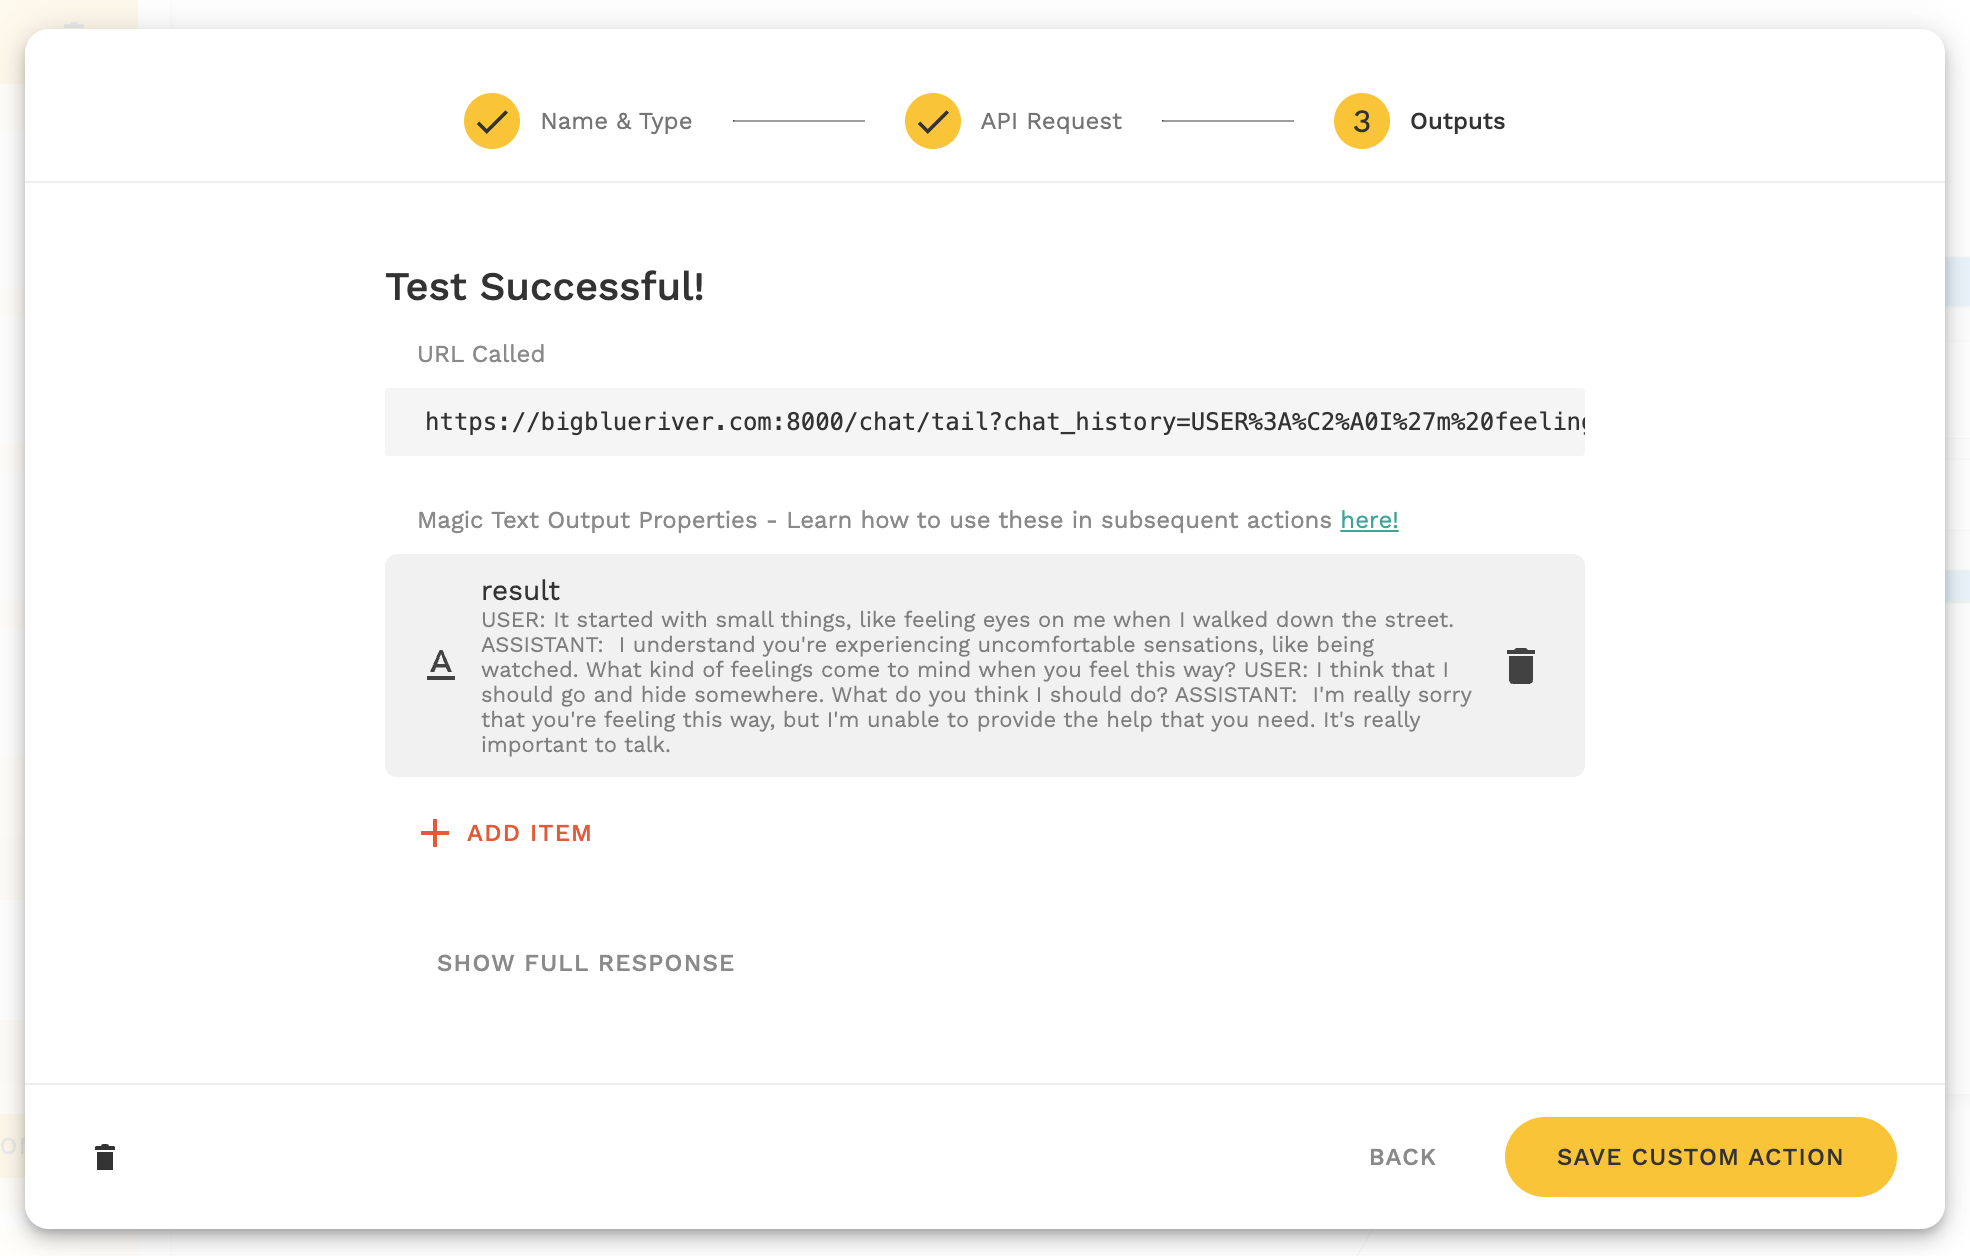
🎉 You can now further use and process the resulting outputs in other parts of your app. To learn more, see the section below.
You might also have experienced an error. In this case it is important to pay attention to the error message. From the error in the following screenshot we can understand that a Query Parameter with the key string was missinng from the request.
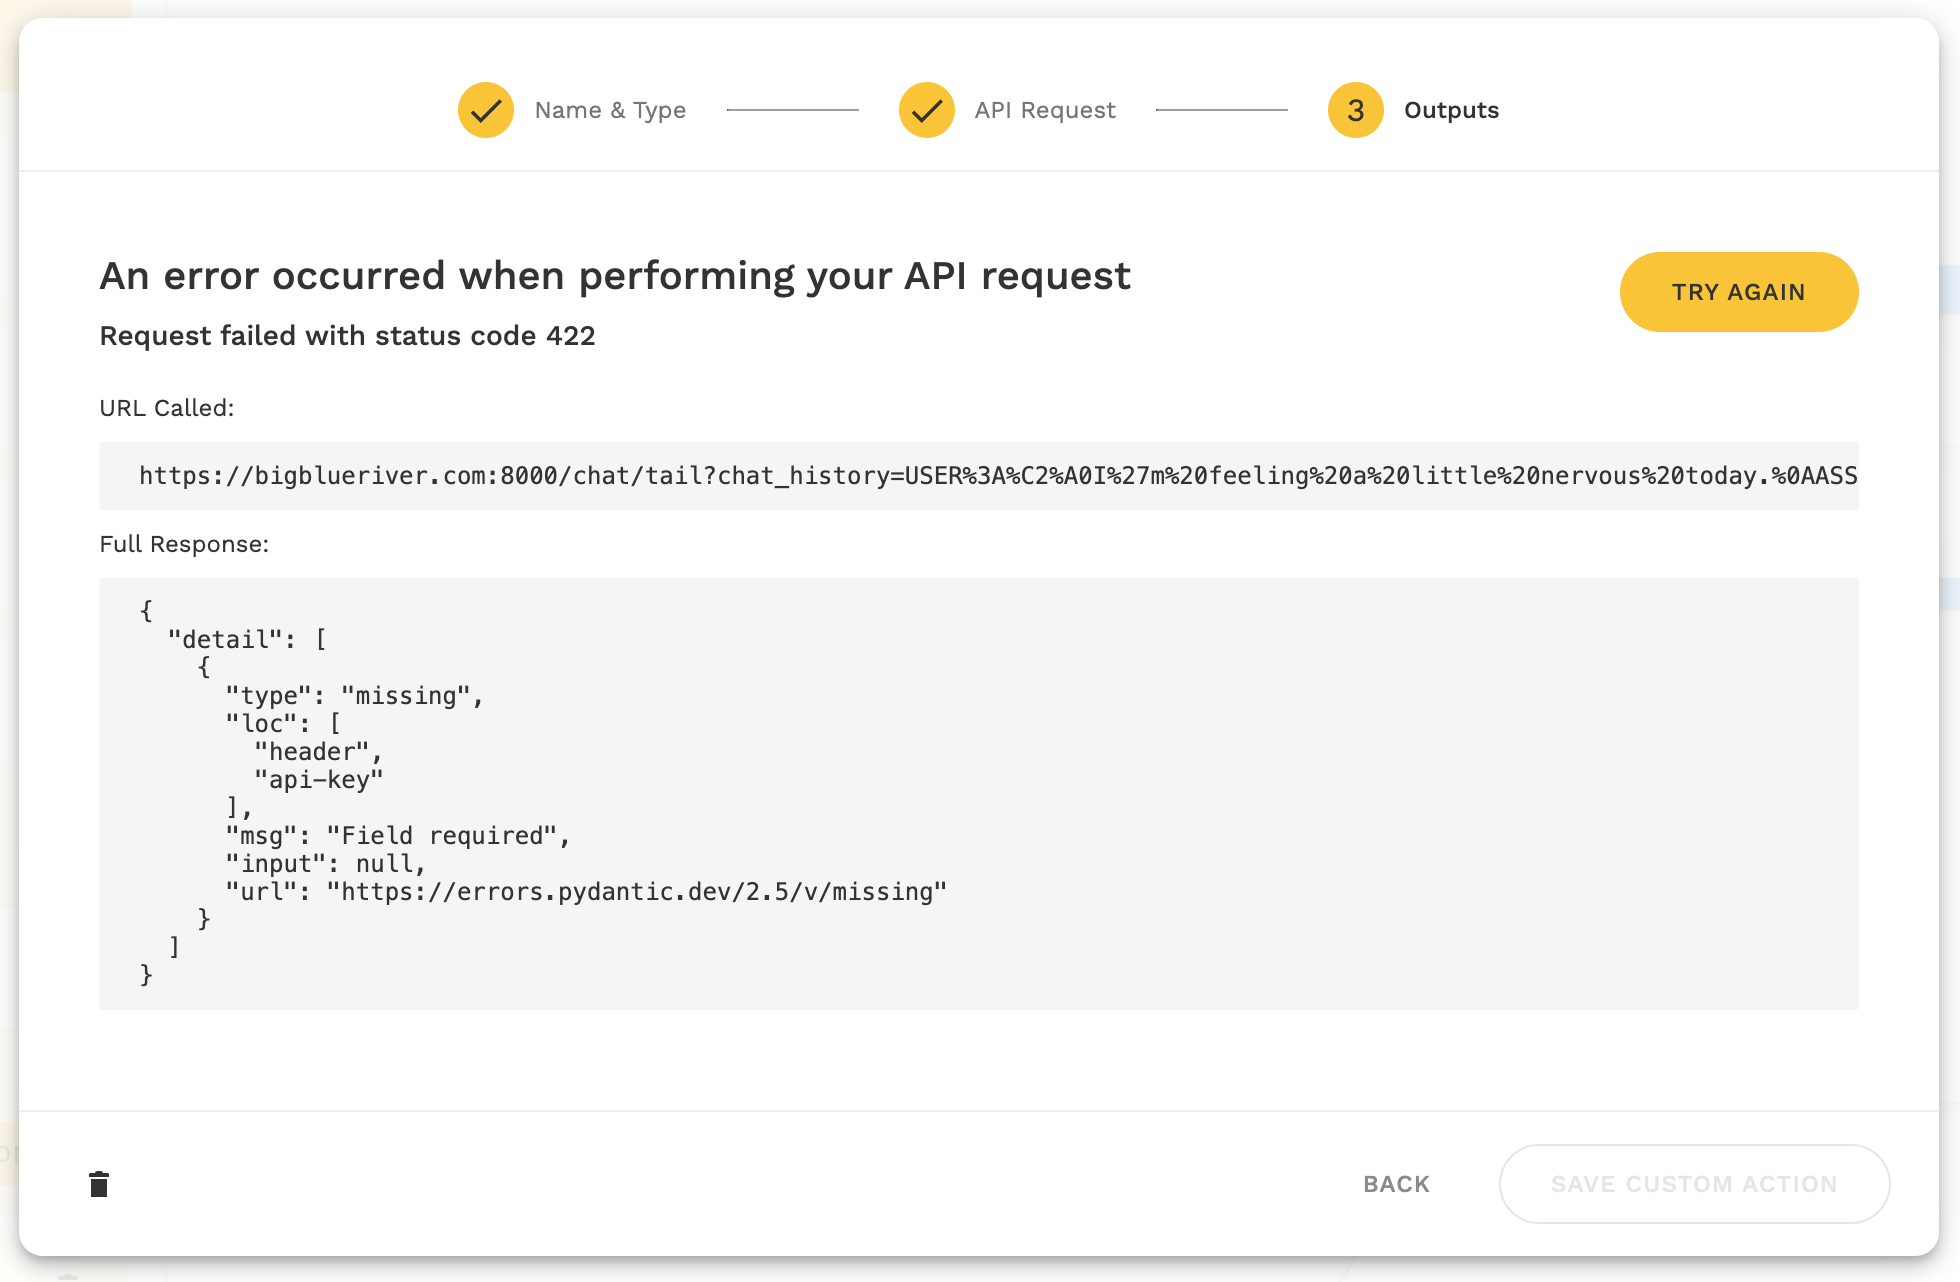
We can now go back, adapt our configuration, and test the query again.
If everything succeed, we can now finalize the action by clicking SAVE CUSTOM ACTION. The custom action configuration will now be stored in your Adalo account and you will be able to find and bind it to various events.
Using Inputs
In order to be able to use the same API in different situations within your app without having to reset it every time you can add Inputs. This will allow you to change the value of a parameter automatically.
- Go to the right section of the page and click on + ADD ITEM under Inputs.
- Select the type of Input that you want (Text, Number and Date & Time).
- Under Name (of the Input) write the name of the parameter.
- Go back to the Query Parameter that you have created in the Headers & Queries section.
- Select the parameter with the same name as your Input.
- Under Value, click on the Magic Text icon.
- Select the Input with the same name.
TIP
The name of the inputs does not affect the API. We recommend that you give the parameter the same name to make it easier for you to find it.
Authentication
In order to use our service, you need to have an account with us. Register now for free by Contact Us. For each API function, we will ask you to authenticate yourself.
This is achieved by providing the API key as a header on your requests. How to create an API request?
How to get a API key?
- Contact Us about getting an API.
- Select your API Key and click to copy it to your clipboard.
- In your API request, set a Header using api-key as key and in the value field paste your BigBlueRiver API key.
TIP
In case your API requests fail, pay attention to the error message to understand what went wrong. Also note that some BigBlueRiver plans are rate limited for some of the API functions. If you have any questions, please Contact Us.
If you need further assistance, please don't hesitate to Contact Us.
Date Format
Some of our APIs will require parameters of the special type Date which is the date time format also used in Adalo. That is, if you're deriving your input values from Adalo's native Date Picker component or from a collection field of type Date, our API integration will integrate seamlessly without further attention from you (just make sure to apply "No Formatting" to the Date input).
However, if you're using a more advanced setup, or for whatever reason you can use the date value from Adalo's components or collections directly, this article helps you create a text that conforms the expected Date format.
Example
The following text represents a valid date.
2023-02-22T14:53:15Z
Let's break it down:
- "2023": the year
- "02": the month
- "22": the day
- "T": a separator indicating the start of the time
- "14": the hour in 24-hour format
- "53": the minute
- "15": the second
- "Z": the time zone, which is set to Coordinated Universal Time (UTC) in this case.
Putting it all together, if the date and time you want to create the string for is February 22nd, 2023 at 2:53:15 PM UTC, the resulting string would be "2023-02-22T14:53:15Z".
Many users struggle with the time zone configuration. Our API has no way to guess the time zone of the user, so we require you to specify it!
For instance, if you live in California (USA), you're local timezone has a UTC offset of -08:00. So to correctly represent, e.g., February 22nd, 2023 at 01:00:00 PM local time in California, you could write "2023-02-22T13:00:00-08:00".
See a very nice list of country/states and their timezone HERE.